

FOOD
3 Yummy Mini Snacks Everyone Will Love + Recipe

A small, prepared and usually decorative food, held in the fingers and often eaten in one bite.” Yep, this is just a fancy way of saying appetizers.
Here are 3 delicious mini snacks to devour. Just add in some party games and you’re ready to go.
Mini Chocolate Chip Cookies

Ingredients
14 tablespoons (1¾ sticks) unsalted butter, divided
¾ cup brown sugar
½ cup granulated sugar
1 teaspoon kosher salt
1 teaspoon vanilla extract
1 large egg
1 large egg yolk
1¾ cups all-purpose flour
½ teaspoon baking soda
One 10-ounce package mini chocolate chips
Directions
1. Preheat the oven to 375°F. Line two baking sheets with parchment paper.
2. In a small skillet over medium heat, melt 8 tablespoons (1 stick) of the butter, swirling or stirring frequently, until the milk solids turn golden brown and smell nutty, 5 to 8 minutes. Immediately transfer to a large bowl and add the remaining 6 tablespoons of butter. Stir to melt.
3. When the butter is fully melted, add both sugars, the salt and vanilla extract; stir to combine. Add the eggs and use a whisk to beat in until the mixture lightens in color and looks smooth and thick, about 4 minutes.
4. Stir in the flour and baking soda until a few streaks remain; stir in the chocolate chips. Cover and chill in the fridge until slightly firm, 15 to 20 minutes. (At this point you can chill the dough, covered, overnight.)
5. Scoop the dough into roughly 1-teaspoon pieces and roll between your palms into round balls. Arrange about 2 inches apart on the prepared baking sheets. (You will have to work in a few batches.)
6. Bake the cookies until lightly golden brown but still soft in the center, 6 to 7 minutes. Cool on the baking sheets for about 5 minutes before transferring to a wire rack to cool completely. Sprinkle with flaky salt if desired. Stored in an airtight container, the cookies will stay soft for up to 5 days.
Baked Mac-and-Cheese Bites
You’re in it to win it, right? Welp, the crowd is gonna go wild for these cheesy bites, which come together in a mini muffin tin.
Ingredients
1 pound small elbow pasta
3 tablespoons unsalted butter
1 small onion, minced
2 garlic cloves, minced
¼ cup all-purpose flour
2½ cups whole milk
¼ teaspoon cayenne pepper (optional)
Salt and freshly ground black pepper
2 cups grated white cheddar cheese
2 cups grated yellow cheddar cheese, divided
Directions
1. Preheat the oven to 375°F. Grease two mini-muffin pans with nonstick cooking spray.
2. Bring a large pot of salted water to a boil. Add the elbow pasta and cook according to the package instructions, about 7 to 9 minutes. Drain.
3. In a large pot, melt the butter over medium heat. Add the onion and sauté until translucent, 4 to 5 minutes. Add the garlic and cook until fragrant, 1 minute more.
4. Sprinkle the flour into the pot and stir to combine. Cook for 2 minutes, stirring constantly.
5. Add the milk and whisk well to combine. Bring the mixture to a simmer over medium-low heat, stirring occasionally.
6. Season the sauce with the cayenne pepper (if using), salt and pepper. Remove the pot from the heat and stir in the white cheddar and 1½ cups of the yellow cheddar. Stir until the mixture is melted.
7. Stir in the cooked pasta and mix until it is evenly coated with the sauce. Scoop 1½ to 2 tablespoons of the mac-and-cheese mixture into each cavity of the prepared pans.
8. Sprinkle a few pieces of yellow cheddar on top of each mac-and-cheese bite and then transfer the pans to the oven. Bake until the cheese is melted and the bites become golden, 17 to 20 minutes.
9. Let the bites cool for 15 minutes before unmolding and serving. Serve hot or at room temperature. Store leftovers in an airtight container in the refrigerator for up to two days.
Mini Chicken and Waffles
With these around, it doesn’t matter who’s winning. Want to shortcut it? Use frozen waffles and don’t look back.
Ingredients
Canola or peanut oil, for frying
1¼ cups all-purpose flour
2 tablespoons cornstarch
1 teaspoon cayenne pepper
1 tablespoon dried Italian herb seasoning
2 teaspoons salt
1 teaspoon freshly ground black pepper
1 cup buttermilk
1½ pounds chicken tenders, cut into bite-size (about 1-inch) pieces
Hot sauce, to taste
Directions
1. In a deep, medium-size pot, heat about 3 inches of oil over medium heat until it reads 350°F on a thermometer.
2. MAKE THE WAFFLES: While the oil heats, make the waffles. Let the waffles cool slightly, then cut them into bite-size (about 1-inch) squares and place them in a 250°F oven to keep warm.
3. MAKE THE FRIED CHICKEN: In a medium bowl, whisk the flour with the cornstarch, cayenne pepper, Italian herb seasoning, salt and black pepper to combine. Pour the buttermilk into a shallow, medium-size bowl.
4. Toss the chicken pieces in the flour mixture to coat. Working in batches, dip the floured chicken into the buttermilk, then return it to the flour and toss to coat.
5. Working in batches, add the breaded chicken to the hot frying oil. Don’t overfill the pot with chicken, as it will bring down the temperature of the oil. Fry until the chicken is golden brown and floats on the surface of the oil, 3 to 4 minutes. Adjust the heat as needed if the chicken is browning too quickly.
6. Remove the chicken from the oil and drain on several layers of absorbent paper towels. Let cool slightly, then place a piece of chicken on top of a waffle square and secure with a toothpick. Serve immediately with hot sauce on the side.
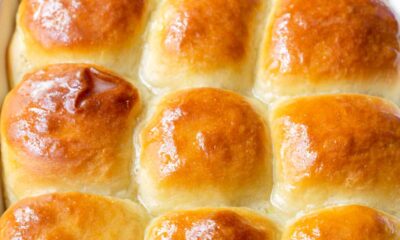


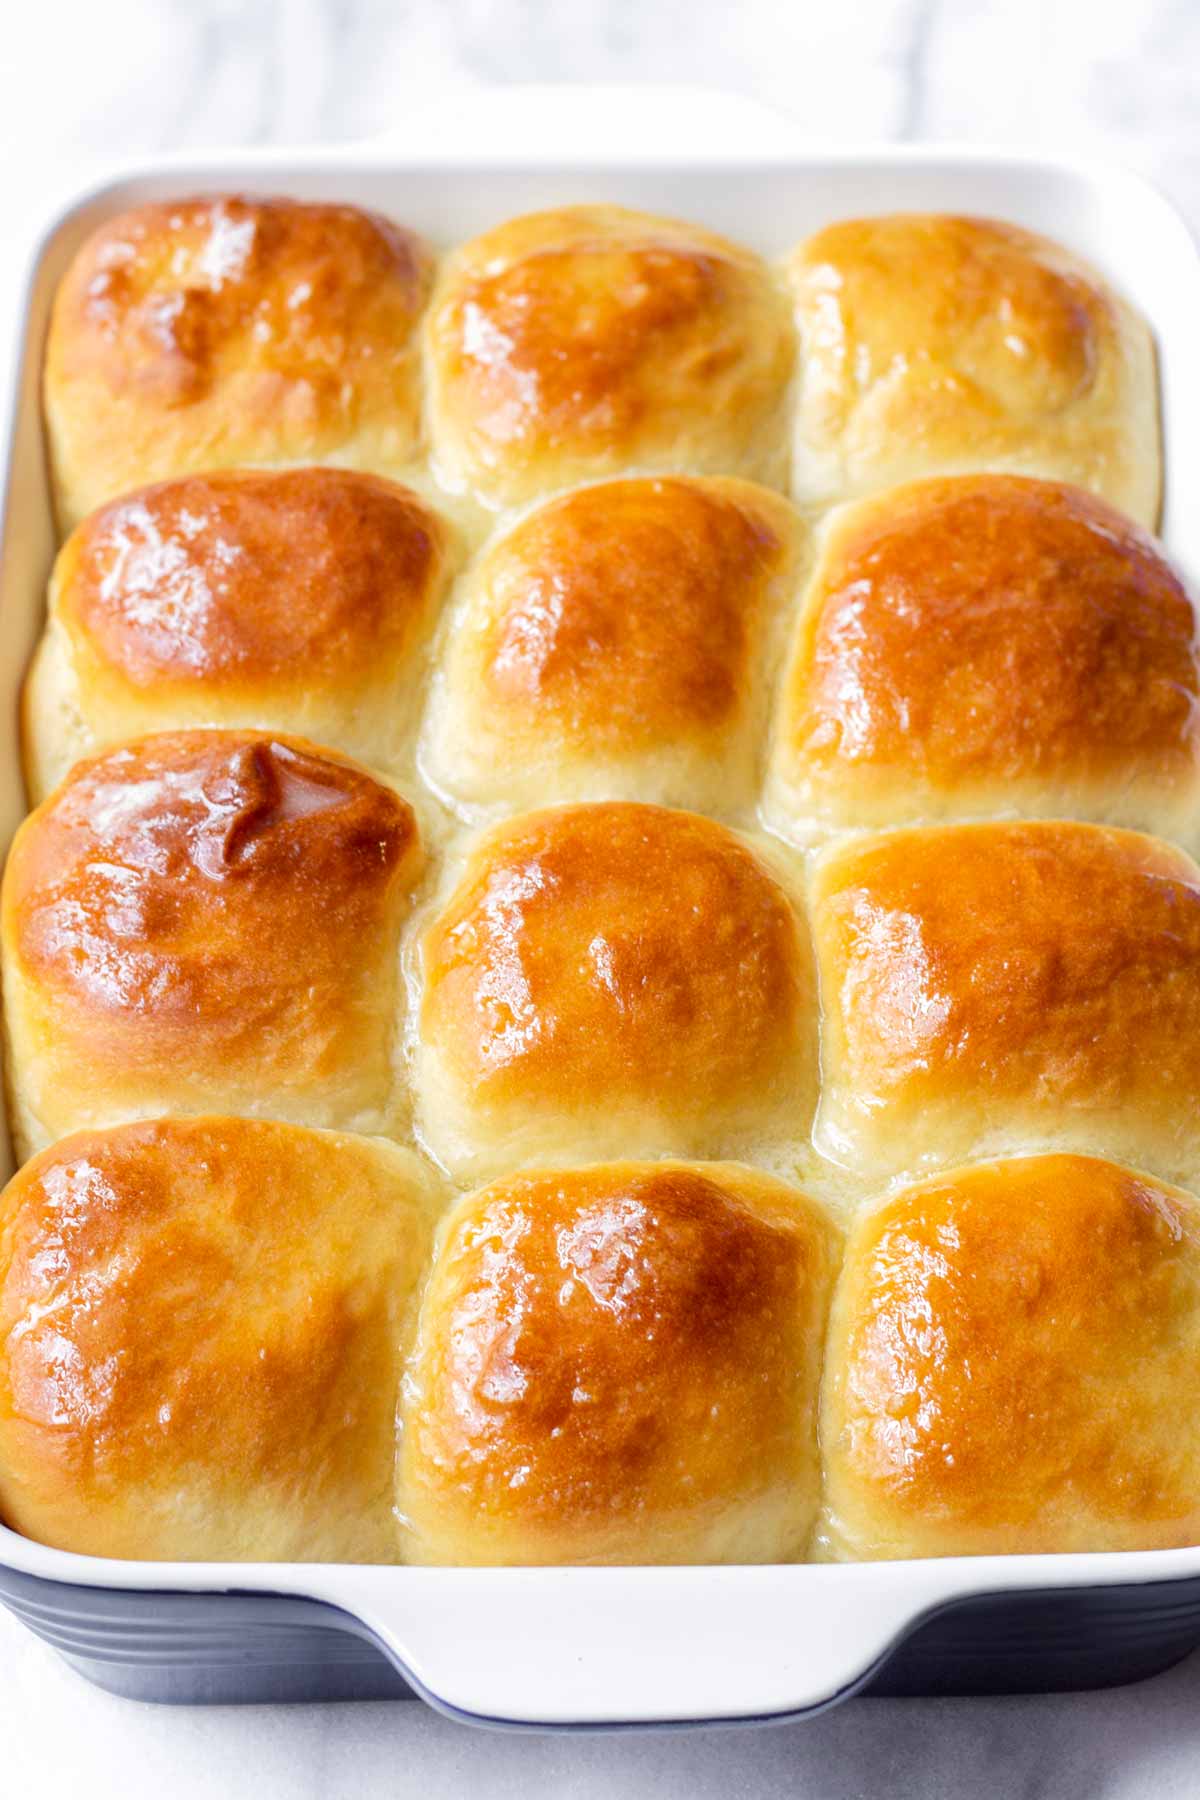
These soft, sweet honey butter dinner rolls are the perfect way to elevate any meal! This delightsome goodness is perfect for Sunday dinners, and special occasions and holidays.
They’re surprisingly easy to make and guaranteed to be a crowd-pleaser. Plus, they’re so delicious that you’ll be making them again and again.
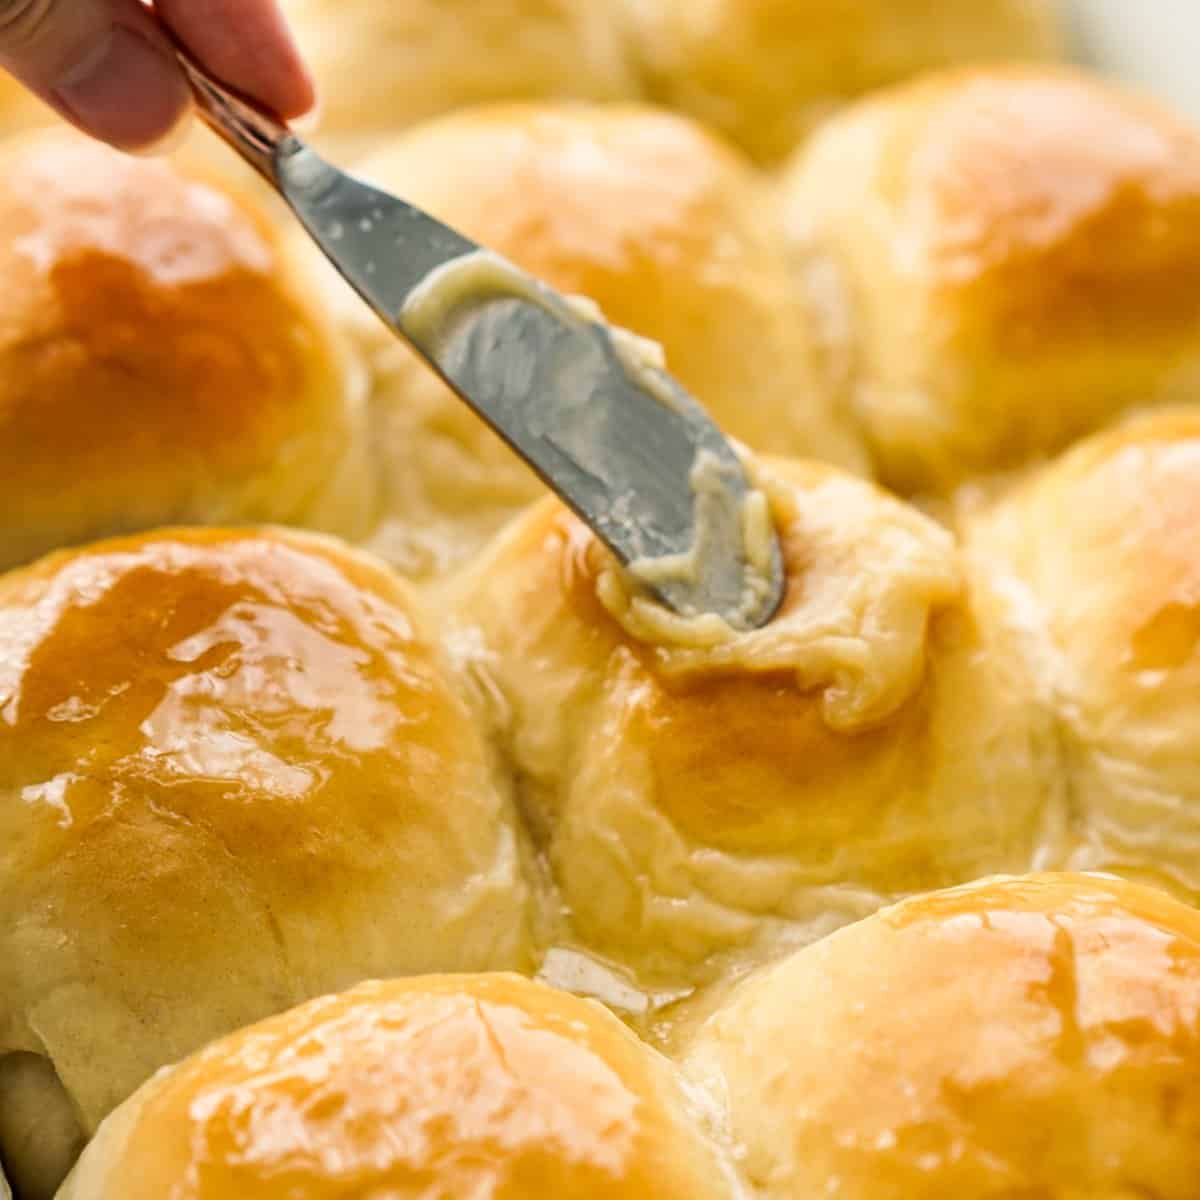
Brushing them with honey butter sauce after baking takes them to the next level. These delightful rolls are perfect for any occasion, from Sunday dinners to holidays and special events.
:max_bytes(150000):strip_icc()/Simply-Recipes-Salted-Honey-Rolls-METHOD-24-e2eb07e4a6f24888bbcbeb3681984cda.jpg)
These dinner rolls are guaranteed to be a family favourite! The secret lies in the honey butter sauce, which creates soft, buttery rolls that melt in your mouth.
Want your rolls to rise faster? Heat some water in a heat-safe dish and place it in your cold oven on a lower shelf. The heat and steam will help activate the yeast and speed up the rising process.
Why you’ll love these honey butter dinner rolls
- They’re Irresistible! These rolls are so delicious, that they’re practically habit-forming. You won’t be able to stop at just one!
- They’re the ideal addition to any special occasion or holiday meal. They’ll add a touch of sweetness and melt-in-your-mouth goodness to your dinner table.
- Get ready for a delightful combination of soft and fluffy. These rolls have an incredible texture that practically melts in your mouth.
- The honey butter sauce is the star of the show! It adds a burst of flavour and richness that will have you wanting more.
- This recipe is mixer-free! No need to worry about extra equipment.
- As long as you can spare an hour and a half (or even more) for rising, you’re good to go. Plus, baking them is a breeze – they take less than 15 minutes!
- These rolls can be prepped in advance! Make them days or even weeks before you need them, and simply bake them fresh when you’re ready to serve.
What you’ll need to make Honey Butter Dinner Rolls:
For the rolls:
- All-purpose flour: This is the base for the fluffy dough.
- Warm whole milk and warm water: These activate the yeast and create a moist dough.
- Softened butter (room temperature): This adds richness and flavour to the rolls.
- Monk fruit sweetener or sugar (the recipe uses monk fruit): Choose your preferred sweetener for a touch of sweetness.
- Envelope of active dry yeast: This helps the dough rise for light and fluffy rolls.
- Egg (room temperature): This adds richness and helps bind the dough together.
- Salt: A pinch of salt enhances the overall flavour of the rolls.
For the honey butter sauce:
- Softened butter (room temperature): This creates a smooth and spreadable sauce.
- Honey: The star ingredient! Honey adds sweetness and a touch of floral flavour.
- Confectioners’ or powdered monk fruit or sugar: This ingredient (choose your preferred sweetener) adds a touch of sweetness and helps thicken the sauce for a perfect drizzle.
Let’s Bake Honey Butter Dinner Rolls, step-by-step
Get ready to make these amazing honey butter dinner rolls from scratch! Here’s a detailed guide:
1. Gather and prep:
- As with most recipes, prepping your ingredients makes things easier.
- First, we’ll activate, or “proof,” the yeast. In a bowl, combine warm water with the yeast packet and 2 teaspoons to 1 tablespoon of your chosen sweetener (monk fruit or sugar). Stir it all together and let it sit for about 5 minutes until foamy. This activates the yeast.
2. Make the dough:
- Once the yeast is proofed, add it to a large bowl with the warm milk, beaten egg, softened butter, and the rest of your chosen sweetener. Use a whisk to combine everything. Don’t worry if the mixture isn’t perfectly smooth – small butter lumps are okay.
- Now, add the flour and salt. Use clean hands to mix everything until it forms a dough ball. The dough might be a bit sticky.
3. First rise:
- Lightly oil another large bowl and place your dough ball inside. Cover it with plastic wrap and find a warm, quiet spot for it to rise. Let it sit for at least 45 minutes to an hour, or until it doubles in size.
4. Make the honey butter:
- While the dough is rising, prepare your honey butter sauce. Simply combine honey, butter, and powdered sweetener (or powdered monk fruit if that’s what you choose) with a spatula. Set this mixture aside for later.
5. Knead the dough:
- Once your dough has doubled in size, gently punch it down with your knuckles to release the air. Flour a pastry board and transfer the dough there. Knead the dough with your hands until it becomes smooth and elastic.
6. Roll and shape the dough:
- Divide the dough into two equal balls. Set one aside for now. Lightly flour your rolling pin and pastry board or mat. Roll out one dough ball into a large square, similar to pizza dough.
- Use a pastry cutter to cut the dough square into small rectangles. You can aim for roughly 16 rectangles, or more if you prefer smaller rolls. Grease a large baking dish (ideally 9×13 inches or bigger) to prepare for baking.
7. Brush and second rise:
- Take your honey butter mixture and lightly brush it over each dough rectangle. Now, roll up each rectangle and place it in the greased baking dish.
- Repeat this process with the remaining dough ball.
- Once all the rolls are shaped and placed in the dish, cover them with plastic wrap and let them rise again in a warm spot for another 45 minutes to an hour, or until they double in size.
8. Bake and enjoy!
- Preheat your oven to 375 degrees Fahrenheit (190 degrees Celsius). Take off the plastic wrap from your baking dish. Bake the rolls for 15 to 20 minutes, or until they’re golden brown on top.
- While the rolls are hot out of the oven, brush them with any leftover honey butter sauce.
- Serve your delicious, warm honey butter dinner rolls alongside your main course.

Helpful tips for making Honey Butter Dinner Rolls:
- The dough might feel a bit sticky before its first rise, but that’s completely normal. Just make sure to grease the bowl before placing the dough inside for rising.
- After the first rise, use your knuckles to gently punch down the dough. This helps release the air trapped inside, leading to better results.
- Don’t forget to flour your pastry board or mat before kneading the dough. This will prevent sticking and make the process easier.
- The recipe uses monk fruit sweetener, but feel free to substitute it with regular sugar if that’s what you prefer.
- Avoid over-kneading your dough. Knead only until it becomes smooth and elastic.
- Make sure to let your dough rise for a second time after shaping the rolls. This allows them to become light and fluffy before baking.
- Keep an eye on your rolls in the oven. To avoid burning, set a timer for 15 minutes. Remember, baking times might vary depending on the size of your rolls or your oven’s specific settings.
- If you’re unsure if your rolls are done baking, you can use the toothpick test! Insert a toothpick into the centre of a roll. If it comes out clean, your rolls are good to go! If it comes out with raw dough clinging to it, bake for a few more minutes.


New Album: KCee Releases Feat. Odumodublvck, Teni, Diamond Platnumz – ‘Mr. Versatile’
KCee has a new album called “Mr. Versatile“. This name shows that KCee is good at doing many different types...


Yemi Alade Releases Her Sixth Album, ‘Rebel Queen’
Yemi Alade has just released a new album called “Rebel Queen“. She is a famous singer from Nigeria, known all...


Ayra Starr Launches Doll Collection
Ayra Starr is a famous singer from Nigeria. She has become very popular in the music world. Many people like...


Musician Khaid Returns To Social Media After Protracted Illness; Unfollows All But Olamide
Khaid, a rising Nigerian music star, has recently returned to social media after a period of absence due to a...


Netflix Subscription Prices Increases In Nigeria For The 2nd Time This Year
Netflix has significantly increased its subscription fees for Nigerian users. This marks the second time the popular streaming platform has...


BBNaija 9: You Must Know These 4 Things Before The New Season Of Starts On Sunday
Africa’s most popular reality TV show, Big Brother Naija, is about to launch its ninth season (BBNaija 9) in a...


Burna Boy To Mark The 5th Anniversary Of ‘African Giant’ With YouTube Special
Burna Boy is a prominent African musician who has achieved global superstar status through his award-winning music and record-breaking concerts....


Babatunde Apalowo’s ‘Londoner’ Wins Best Fiction Feature Prize At Durban FilmMart
“Londoner” is an autobiographical film that tells the story of Ayo, a Nigerian bank manager who moves to London to...


Davido Partners With GAC Motors In Multi-Million Deal
David Adeleke, who is famously known as Davido, has entered into a new business agreement with GAC Motors, a well-known...


KCee Teases Release Of New Album, “Mr. Versatile”
KCee is a well-known Nigerian musician who has been making popular music for almost 20 years. He has managed to...


10 Reasons Why Working Out Is Good For You

New Music: BoyPee, Hyce & Brown Joel Feat. Davido – Ogechi

10 Lace Gown Styles To Steal The Show At A Wedding

Why Women Break Up With Men They Are Still In Love With

Shakira To Perform At 2024 Copa América Final On Sunday

My Wedding Dress Is The Most Comfortable Dress I’ve Ever Worn – Sharon Ooja Appreciates Designer Veekee James

Why ‘Isiagu’ Styles Are Becoming Norm At Igbo Ceremonies

Why Do Women Live Longer Than Men? See Reasons Behind The Longevity Gap

6 Ways To Stay Informed Without Sacrificing Your Mental Health

5 Things You Should Always Keep Private
-

 ARTS & CULTURE7 days ago
5 Powerful Goddesses Who Answer Prayers In Nigerian Traditional Religions
-

 BEAUTY6 days ago
Hair Care Tips For All Nigerian Hair Types
-

 FAB FRESH5 days ago
Rising Artist Litovibes Features Patoranking In New Single, ‘My Way’
-

 FASHION7 days ago
What Qualifies As Distressed Fashion?
-

 FASHION6 days ago
Suit Up & Stand Out: How To Wear A Head-Turning Suit In 2024
-

 SPORTS4 days ago
Nigeria Vs Brazil: Time And Where To Watch The Super Falcons’ 1st 2024 Olympics Game
-

 OPINION6 days ago
How To Build Trust For A Stronger Relationship
-

 HEALTHY LIVING5 days ago
Why Fibroids Come Back After Surgery